4 Advanced SEO Features You Cannot Ignore in 2016

SEO is not just about keywords and links but there are a number of other factors that play a role when it comes to achieving the highest possible rankings. Four of these factors that are not given the proper attention are breadcrumbs, canonical URLS, hreflang (for multilingual websites) and paging (for multi page content).
#1 – Breadcrumbs and SEO
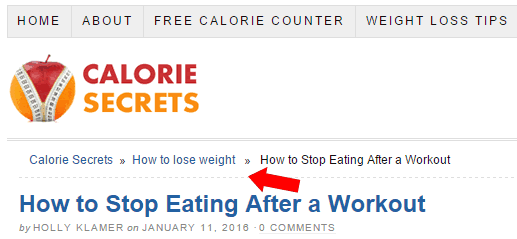
A breadcrumb is a simple menu of internal links located at the top of the page and servers a number of purposes:
First, it allows users to quickly navigate the website and understand how ‘deep’ they are from the home page or main section page.
Second, search engines use them to learn more about the structure of a website (during the crawling process).
Third, Google is using them in their search results.
There are many WordPress themes that have built in and configurable breadcrumbs but there are also themes that don’t have breadcrumbs and this is not the best SEO practice.
In such cases the easiest way to add a breadcrumb to your theme is to either hire a developer to make the necessary changes or make use of a plugin.
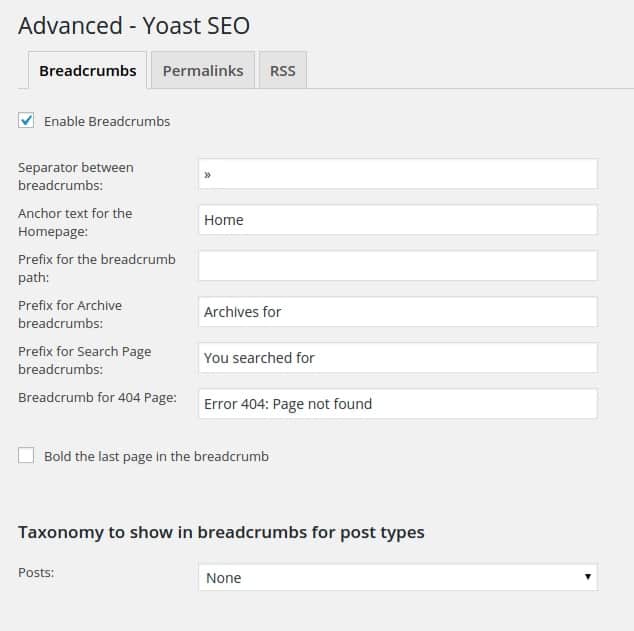
Yoast SEO has built in support for breadcrumbs and all you have to do is to enable and configure them.
Breadcrumbs and Schema
The importance of Schemas for SEO and this is also applicable to breadcrumbs. To help search engines identify your breadcrumb hierarchy, you can use structured data markup to tag the different components that make your breadcrumb menus.
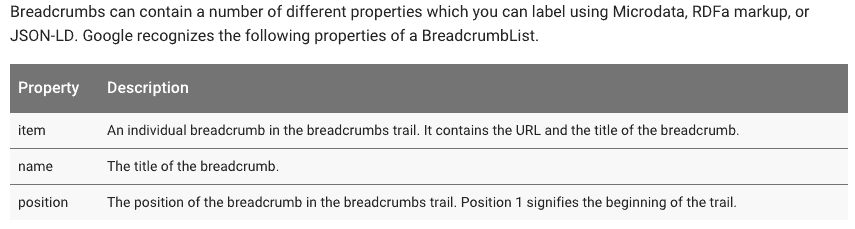
It should also be noted that breadcrumb markup is used when presenting information of a website in the search results, as you can see in the example below:

Another nice feature of breadcrumb markup data is that you can use it to make your breadcrumbs more user friendly (especially for mobile users) by removing characters that don’t have to show on mobile.
#2 – Canonical URLS
One of the biggest problems of almost all kinds of websites is duplicate content. Although Google mentioned many times that it will not penalize a website because of duplicate content, having non unique content on your website makes it less important for Google and for users.
There are many ways to deal with duplicate content but one of the most efficient ways is to make use of canonicalization.
As a topic it sounds complicated but in reality it’s a simple method to give Google more details about your website and in particular help them differentiate your most important content from the rest and thus avoid getting into any duplicate content issues.
When and why you should use canonical URLS?
You should use canonical URLS on pages that have similar content.
A canonical URL will tell Google which page to include in their index.
Let me demonstrate how this works with a real example. Assume that you have a property rental website and have a page with this URL:
http://www.example.com/villas-in-california.
To help users find which property to rent, you have several filters related to the exact location of the villa, number of bedrooms, facilities etc.
When users click on an option to apply a filter the URL becomes:
http://www.example.com/villas-in-california/?filter_location=140&filter_beds=2.
The content on this page is similar to the content of the parent page (villas-in-california) and there is nothing new to make this page unique for the website.
During the crawling process, search engines can understand that these 2 pages have the same content and they have to decide which one to keep in their index. By adding a canonical URL to the child page that will point to the parent page, you solve the problem once and for all.
In practice, the link should look like this:
<link rel=”canonical” href=” http://www.example.com/villas-in-california” />
You should use a canonical URL to consolidate incoming links to a single page.
When other websites link to your pages you may want to consolidate links to a single page.
In the example above, by adding a canonical URL to the dynamically generated pages, you pass the link value to your main page.
Canonical URLs are a must when syndicating content
When you syndicate your content on other websites or blogs, it is important to have a canonical URL that will point to the original page on your website. By doing so Google will know which website published the content first and avoid any duplicate content issues especially when you syndicate your content on websites that have more authority than yours.
Google has more information and some nice examples about canonical URLS that are worth studying in more detail.
How to add canonical URLS to your website
Canonical URLS appear in the header of a website (<head>) and have the following format:
<link rel=”canonical” href=”some url.com”/>
Each page should only have ONE canonical URL definition otherwise search engines may get confused.
It is a good practice to have a canonical URL on ALL your website pages even if the canonical URL points to the page itself. This is useful because if someone ‘steals’ your content, the canonical URL will still point to your website so you have nothing to worry about.
Before doing anything else, navigate to a page on your website and view the source code (right click and select VIEW SOURCE from the pop-up menu).
Search for the word ‘canonical’. If you find an entry and it is in the same format as the example above it means that you already have canonical URLS defined. If not then you can proceed with adding them with the help of a plugin.
Yoast SEO plugin does a very good job with canonical URLS. When you activate the plugin it adds by default a canonical URL on every page (including post and archive pages). The value is the same as the permalink of the page.
If you want to change it, you can do so in the ADVANCEDtab found in the Yoast SEO settings on each page.

#3 – Multilingual websites
If your website is available in more than one languages, then you need to implement hreflang. Hreflang will help Google serve the most appropriate page to your users (i.e. Your German pages for people in Germany) and also keep you out of possible duplicate content issues in cases where you have the same content translated into different languages.
There are two ways to implement it, the first one is by adding some tags on each and every page of your website and the second way is to do it via the sitemap.
Using hreflang tags
The idea behind hreflang is that for each page on your website, you need to tell search engines the equivalent URL in all languages that the particular page is available.
For example, if you have a website in English and Spanish then for each page you need to have in the header the hreflang tags that identify both the English and Spanish versions of the page, like the example below:
<link rel=”alternate” href=”http://www.example.com/en/page1/” hreflang=”en” />
<link rel=”alternate” href=”http://www.example.com/es/page1/” hreflang=”es” />
There are other technical details that you need to take into account like country codes, what content to show for geographically unspecified users and many others so if you plan to do this manually you need to study this guideby Google carefully.
An alternative way, if you are on WordPress, is to use a plugin and wpml is the most popular one. All you have to do is install it on your website, choose your language settings and the plugin will take care of the technical details.
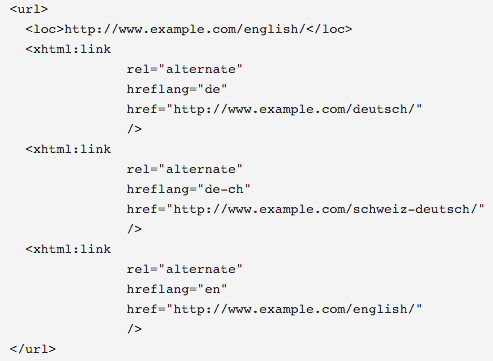
Sitemap
If you don’t want to add the hreflang tags in your website’s code, another way of implementing it is via your sitemap.
I have explained in details how to optimize your sitemap for SEO before and in addition to that you can enrich your sitemap further to include the necessary data for hreflang.
Basically the idea is the same as before, for each page on your sitemap you need to add the URLS in all available language versions like the example below.
How to check your Multilanguage implementation?
Once you make the necessary settings, login to your Google search console account and click INTERNATIONAL TARGETING under SEARCH TRAFFIC.

In the first tab (Language), Google will give you more information about your hreflang implementation (errors and warnings) and in the second tab (Country) you can select your target audience.
In cases where your website is available in more than one languages and in cases where you want to target the whole World and not a particular region leave this unchecked or select UNLISTED from the drop down menu.
If you only have one language and you want to target people in that geographical area, then select the country from the dropdown.
For example, if your website is in German and you target users in Germany then you should select Germany from the dropdown.
#4 – Paging
In the context of SEO, the term paging is used to describe a situation when you publish a big article in several parts (pages). For example, let’s say that you have a guide that is 10,000 words long and instead of publishing it as a single blog post, you publish it as a series of blog posts:
http://www.example.com/myguide-part1
http://www.example.com/myguide-part2
http://www.example.com/myguide-part3
http://www.example.com/myguide-part4
Google is doing a great job in indexing all parts of the article but if you want to tell Google that all pages are essentially one big article, you can use the ‘next’ and ‘prev’ tags.
The advantage of doing this is that Google will always show the first part of the article in the search results and will also consolidate their linking properties.
You can use this technique in cases where you want your users to click NEXT to read the next part of an article. Your pages will load faster and users will spend more time on your website.
The disadvantage is that most users don’t like to click to read the next part as they prefer to have everything loaded in one page.
So, before taking a decision you need to consider the experience of your users. Perform A/B testing by applying this technique on some posts and take measurements before adopting this policy for all the content on your website.
How to implement paging for SEO
Implementation wise, all you have to do is define in the <head> of each page the ‘next’ and ‘prev’ tags.
Using the same example as before this is the code you need to add to:
The first page
<link rel=”next” href=”http://www.example.com/myguide-part2″>
Second page
<link rel=”prev” href=”http://www.example.com/myguide-part1″>
<link rel=”next” href=”http://www.example.com/myguide-part3″>
Third page
<link rel=”prev” href=”http://www.example.com/myguide-part2″>
<link rel=”next” href=”http://www.example.com/myguide-part4″>
Fourth page
<link rel=”prev” href=”http://www.example.com/myguide-part3″>
Conclusion
SEO optimized WordPress themes have these features built in.
The bottom line is that although the above changes don’t guarantee that your rankings will skyrocket, for sure they contribute positively in making your website more SEO friendly.
4 Advanced SEO Features You Cannot Ignore in 2016
![4 Advanced SEO Features You Cannot Ignore in 2016]() Reviewed by Unknown
on
07:38
Rating:
Reviewed by Unknown
on
07:38
Rating:


No comments: